In last post of this series we learnt the process of SDDC bringup aka Management Domain deployment. Also we verified we are able to login to SDDC manager. The management domain is integrated in SDDC manager by default during bringup process.
In this post I will walk through steps of deploying a Virtual Infrastructure Workload Domain. If you are new to vCF and wondering what a workload domain is, then in simpler words its resource cluster where end users will provision their vm’s.
If you are not following along this series, then I recommend reading earlier posts of this series from below links:
1: Physical/Virtual Infra Preparation
2: DNS and IP Pools Requirements for vCF
3: Nested Esxi Host Deployment & Configuration
4: Deploying Management Domain aka SDDC Bringup
All the components that will be managing the VI workload domain are deployed in management domain for e.g vCSA, NSX etc.
Note: NSX controllers for workload domain are deployed on Esxi hosts that are part of workload domain.
There are few prerequisites that must be met before deploying the VI workload domain. These are listed here
Typical workflow of a VI workload domain can be summarized as below:
Workload domain deployment is kicked from SDDC Manager UI. We need to have vanilla Esxi hosts available with the basic configuration.
Below are the steps for deploying a new workload domain.
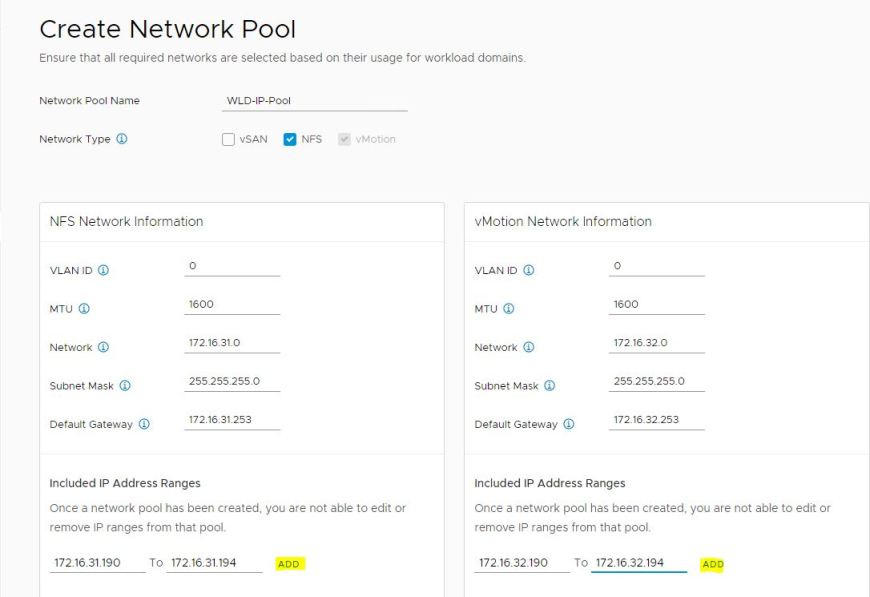
1: Create Network Pools: We need to create a pool of IP’s for vMotion and vSAN network. These IP’s will be configured on portgroups of Esxi hosts that will be part of workload domain.
To create a new pool, login to SDDC manager and from home page navigate to Administration > Network Settings and click on Create Network Pool.
Provide a name for the pool and select whether you need to use NFS or vSAN.
Specify VLAN, MTU, Network mask etc and a range of IP address. Range of IP’s should be equal to more than number of hosts that will be participating in workload domain.
Note: You can’t use same network segment for both NFS and vMotion with VLAN 0. It will not allow you to save the configuration. You can keep VLAN as 0 but network should be different.
Click on save button to finish the IP pool creation wizard.
2: Commission Hosts: Before a workload domain can be deployed, we need to add free Esxi hosts to the vCF inventory. This process is called “commission hosts”.
To commission new hosts, navigate to Dashboard > Hosts and click on commission hosts button.
Please ensure you have met all prerequisites of the checklist. If any configuration is missing please don’t proceed.
Once you have fixed the pending stuffs, check mark the select all box and hit Proceed button.
On Host Addition and Validation page, select Add new and provide the necessary info. Select the appropriate network pool corresponding to storage type that will be provisioned.
Repeat the process to add other hosts.
Once all hosts are added, select the hosts and click on confirm fingerprint.
Once fingerprint is confirmed, click on Validate All button and wait for host validation to finish. Hit Next to continue.
Review the settings and hit commission button to start the commissioning process.
Once the hosts commissioning process is finished, they will appear under unassigned hosts and host status as “Active”.
Now we are ready for workload domain deployment.
Click on the Workload Domain button and select VI-virtual infrastructure.
Select the type of storage and hit Begin button.
Provide a name for Virtual Infrastructure, Cluster and Org. Hit Next to continue.
Provide IP and other info for the vCSA appliance and hit Next.
Select NSX-V or NSX-T and punch in relevant NSX related info and hit Next.
Note: Be careful with NSX password policy. Use a 12 character long strong password that doesn’t contain ? character.
Select the hosts that you want to put in the workload domain and hit Next.
Provide information of the NFS server and the folder that is exported as NFS share. Folder name should be prefixed by /
Select appropriate license keys and hit Next.
Nothing much to do on object names page. Hit Next to continue.
Review your configuration and hit finish.
Workload domain creation task will be initiated.
Wait for 2-3 hours for workload domain creation to complete.
Once all sub tasks of workload domain creation finishes, the newly created VI workload domain will appear in SDDC Manager.
And that concludes this post.
I hope you enjoyed reading this post. Feel free to share this on social media if it is worth sharing


